
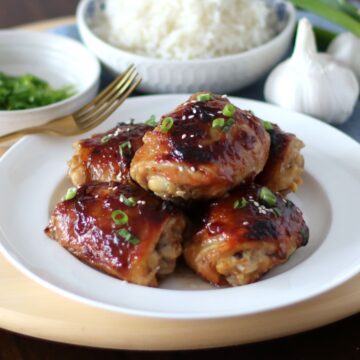
Transform your dinner routine with our Baked Teriyaki Chicken Thighs recipe! Making your own version of a Teriyaki sauce is very easy! Read through our recipe for the best tips on how to achieve that delicious caramelized sauce on top! Pair this delicious dish with our Buttered Garlic Rice and our super fresh Raw Carrot Salad!
Try our Apricot Chicken recipe if you enjoy more of a sweet and savory flavor with chicken. Not a fan of sweetness with chicken, then our one-dish Chicken and Rice Bake recipe is for you!

Chicken thighs are a super tender and juicy source of protein. The dark meat contains a lot more nutrients to support a healthy immune system than the white meat from the chicken breast. Find them in the grocery store and you'll also notice that they usually have a lower price point than the popular breast.
What you'll need
Making your own Teriyaki Sauce is a lot easier than you might think. You can also benefit on having more control in the amount of sugar going in the sauce. You want to make sure to use Low-Sodium Soy Sauce when making this recipe. Regular soy sauce will make it way too salty. Let's see what you'll need to get started.

- Corn Starch
- Water
- Low Sodium Soy Sauce
- Brown Sugar
- Toasted Sesame Oil
- Fresh Ginger Root
- Fresh Garlic Cloves
- Chicken Thighs (with skin and bone in)
- Green Onion (for garnish)
- Sesame Seeds (for garnish)
See recipe card for quantities.
How to make it

Start by whisking the water and the corn start in the pan to make a slurry. Continue by adding all the other ingredients for the sauce in the pan.

Place the pan over medium heat and bring to a simmer while whisking. Cook the sauce for a couple minutes while whisking, until thickened.

Make sure to divide the cooked Teriyaki Sauce in 2 dishes. Use ⅔ of it for basting the chicken and reserve the ⅓ for serving with the rice. This prevents cross contaminations from the raw chicken.

Preheat the oven to 350F. Place the chicken thighs in a greased 9"x13" baking dish.

Brush the Teriyaki sauce generously on both sides. The thighs should end up skin side down when going into the preheated oven. Bake for a total of 48 minutes. More details in the next box.)

Bake initially for 12 minutes.
Baste the thighs with more sauce and bake for another 12 minutes.
Flip the thighs, skin side up and brush with sauce. Bake for 12 minutes.
Brush with a final coat of sauce and bake for 12 minutes or until the internal temperature reaches 165F.

Hint: To get a darker caramelization on the chicken, place it under the broiler. Make sure the pan is on the rack in the middle position. This will ensure a nice and slow caramelization, without burning. Keep an eye on it at all times when under the broiler, it should only take around a minute.
Store you baked Teriyaki Chicken Thighs
This is such a great recipe for meal prep! Pair it with some beautiful rice and steamed broccoli and refrigerate in air-tight containers for 2-3 days for meals on-the-go.
Top tip
Pour some of the reserved Teriyaki over freshly cooked rice for a quick and easy snack. Garnish with green onions and sesame seeds. This is definitely one of my favorite parts of making this dish! Enjoy!

Recipe
Baked Teriyaki Chicken Thighs
Ingredients
Teriyaki Sauce
- ? cup Water
- 1½ tablespoon Corn Starch
- ? cup Low Sodium Soy Sauce
- ¼ cup Brown Sugar
- 1 tablespoon Toasted Sesame Oil
- 1 teaspoon Fresh Ginger , finely grated
- 3 cloves Fresh Garlic , finely minced
Other Ingredients
- 9 pieces Chicken Thighs (skin and bone in)
- 1 large Green Onion , finely sliced (for garnish)
- 1 teaspoon Sesame Seeds (for garnish)
Instructions
- Preheat your oven to 350F with the rack in the middle position. Prepare a 9"x13" baking dish with non-stick spray.
- In a medium sauce pan (off the heat), whisk together the corn starch and the water to obtain a slurry. Whish in the soy sauce, brown sugar, sesame oil, ginger, and garlic.
- Place the sauce pan on medium heat and bring to a simmer while whisking continuously. When the sauce thickens, continue whisking and cooking for a minutes. Take the Teriyaki sauce off of the heat and transfer in 2 dishes. Two thirds of the sauce will be used for brushing on the chicken. The rest can be reserved to serve with the cooked chicken (and rice). *Do not serve any of the sauce that has been in contact with the raw chicken.*
- Place the chicken thighs in the prepared baking dish, skin side up. Brush the top generously with the sauce. Flip them, and brush them with more sauce. The thighs should be facing skin side down when going into the preheated oven. Bake for a total of 48 minutes, basting with more sauce, at 12 minute intervals.
- After the second 12 minute interval (at the 24 minute mark) remove from the oven and flip the thighs so that they are skin side up and baste with more sauce. Place back into the oven for 12 minutes.
- Take out of the oven and brush a final coat of Teriyaki sauce and bake for 12 minutes, or until the internal temperature is at least 165F.
- When ready, you may want to place under the broiler to get more caramelization on the sauce. Make sure the baking dish is on the medium rack when broiling, so that the sauce does not burn. Keep an eye on it, it does not take very long.
- Take out of the oven, and sprinkle with the sliced green onions and sesame seeds. Serve with rice and your veggies of choice. Enjoy!


Why not include the quantities of soy sauce and water?
Apologies, there has been issues with the transfer of recipes when moving to a new platform. We are working to fix this issue.